We recently received a request to monitor a call and terminate it if, at any time, a tone is detected on the call.
This technique was required as a method of aborting one cycle of an automatically repeating drive test in which the test calls were made between two DSLA’s, one at a fixed location and one in a vehicle. The requirement was to allow a user to abort a test cycle in the vehicle, by simply pressing a key on the dial pad of a cell-phone.
We were able to devise a solution for this requirement by using some Remote Access scripting and Channel B to monitor the call on Channel A. Channel B runs a tasklist that waits for the "stop-tone" which when detected ends the test. The Remote Access script waits for the tasklist on Channel B to complete and then stops the test call on Channel A.
Configuring Channel B to monitor
Assuming the phone/phone-line is connected to Channel A, we first set the DSLA Monitor on the Node in Node View to monitor the input of Channel A only. This is done by right-clicking on the Channel A node in the MultiDSLA Node View and selecting Monitor Levels.
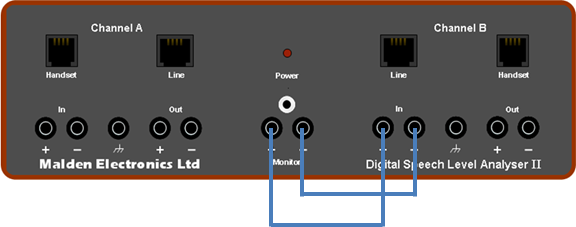
Next, the monitor output is connected to the input of Channel B using 4mm plug leads as shown in the figure above.
Writing a tasklist for Channel B
The tasklist for Channel B is simple. Let's assume that the terminating-tone is a DTMF 5 digit. Starting with a blank tasklist, we add a Wait For DTMF event to the first node in the empty task as shown below. Note: although the tasklist calls this Node A, this is not the same as Channel A. It just tells us that the Wait event will be run on the first node in a test.
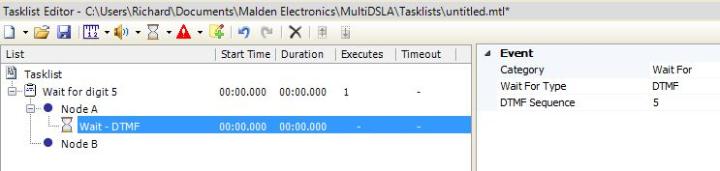
In the example we have also named the task in order to make debugging easier when viewing test progress in the event log. We save the tasklist to the Users folder in the working directory, calling it waitFor5.mtl
Configuring nodes
To run a test in MultiDSLA you need to have at least two nodes, a "source" node and a "destination" node. Channel B is the "source" node, but we need to have a "destination" node against which to run the test. The "destination" node does not actually perform any activities in the test, so adding and using an uncontrolled node is appropriate. The node configuration for Channel B must be set to Balanced.
Writing the Remote Access script
The steps below describe the contents of the Remote Access script. We assume that the Channel A test is configured to start automatically every 15 minutes.
- Get a list of running tests and extract the testID for the Channel A test. Only one test is running in the example below> TEST GETRUNNINGLIST33 Example Test 21/09/2011 15:33:14 Local A Remote A
- Start test on Channel B using the waitFor5.mtl, storing the returned testID> TEST START "Users\waitFor5.mtl" "local B" "dummy"34
- Poll the progress of the Channel B test until it is reported as being FINISHED> TEST GETPROGRESS 34RUNNING> TEST GETPROGRESS 34FINISHED
- Stop the test-call of Channel A test, the next test call will automatically start at the scheduled time> TEST STOP 33OK
- Loop back to step 2
Contact Opale Systems or your distributor for more information.